The Space Elevator is the largest structure you can build in Satisfactory. It connects directly to your employer, FICSIT, in orbit and helps you better explore the planet and move materials faster. You’ve already built it and completed Phase 1 to unlock Tier 3 and Tier 4 Milestones—and if you followed our previous guides, you should have wrapped those up by now. But Tiers 5 and 6 are gated behind another Space Elevator delivery, so you need to take care of it next. Phase 2 is notably more demanding and requires several harder-to-produce items—this guide explains them in a simple, practical way.
Satisfactory Space Elevator Phase 2: Infrastructure and planning
To progress the Space Elevator, you’ll need items that only unlock in Tier 3 and Tier 4. Their production takes time, so it’s worth putting serious thought into your factory layout.
For Phase 2 you need:
- 1000x Smart Plating
- 1000x Versatile Framework
- 100x Automated Wiring
The two materials you need 1,000 of can take a lot of time. It’s important to either scale your factory or keep yourself busy with other tasks while they accumulate.
You should also check the AWESOME Shop and the MAM for potential advantages. In the AWESOME Shop, you can purchase new foundations and better logistics options for building production lines (Satisfactory AWESOME Sink & Shop: How to farm coupons fast) . MAM research pays off for alternate recipes that can let you skip or simplify parts of the following sections (Satisfactory MAM Guide: Research, Hard Drives & Best Alternate Recipes) .
Also take advantage of what you unlocked in Tiers 3 and 4:
- Expand your coal power so you have enough electricity.
- Use trucks if you’re operating multiple, distant stations.
- Use Mk. 3 conveyor belts for faster transport.
Smart Plating in Satisfactory: Scale up production
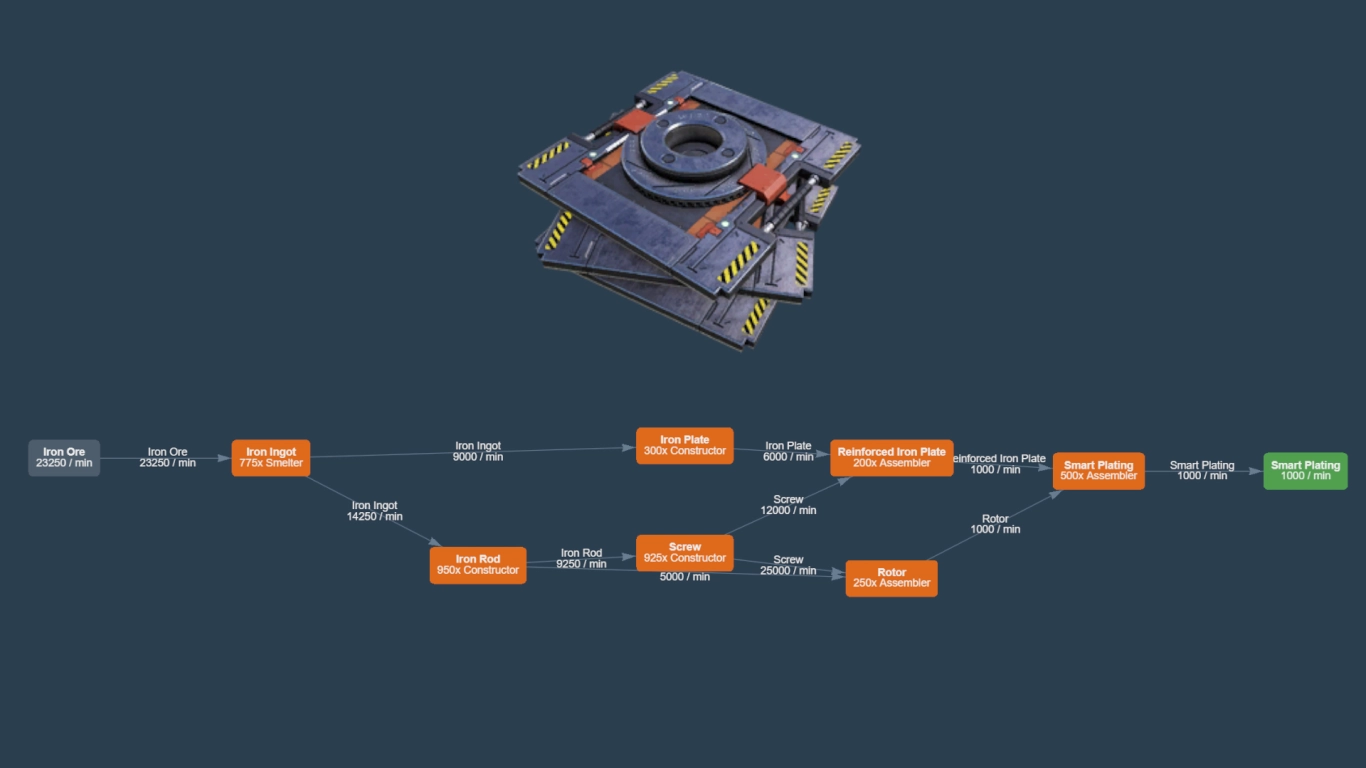
You already needed Smart Plating for Phase 1—only 50, though. Producing 1,000 is far more demanding, so it’s worth expanding this production line. With just a single line, it would take about 16 hours of runtime to finish.
Smart Plating only requires iron, but you’ll split that into two lines. One makes iron plates, the other makes iron rods. Convert rods into screws. Combine screws and plates to make reinforced iron plates, and also use screws and rods to produce rotors. In an assembler, those two products—reinforced iron plates and rotors—become Smart Plating.
Alternate recipes are especially valuable here. You can unlock them with hard drives in the MAM. Keep an eye out for:
- Screws directly from iron ingots instead of iron rods (Alternate: Cast Screws)
- Improved iron plate recipes
- Reinforced iron plates that use wire instead of screws (Alternate: Stitched Iron Plate)
Crafting Versatile Framework: Optimize steel and frames
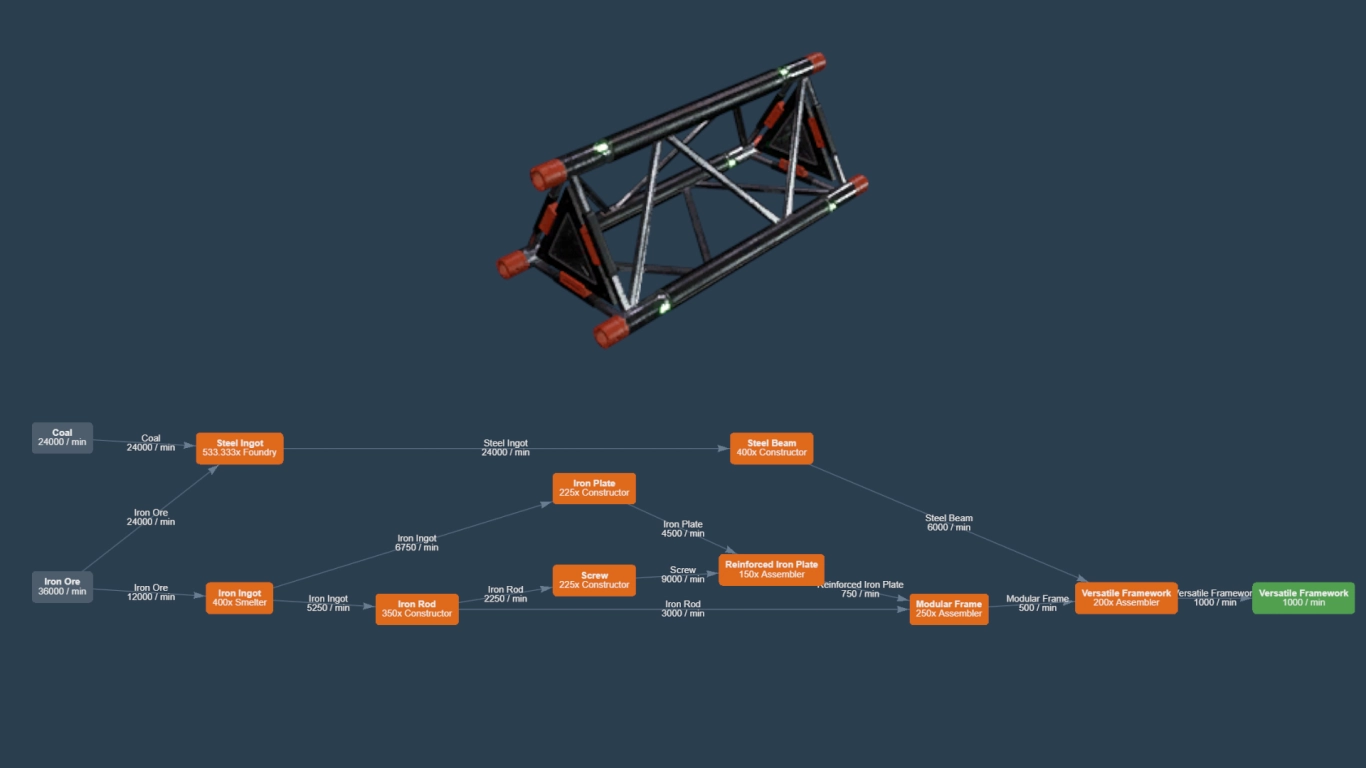
The most involved part of this phase is producing the 1,000 Versatile Framework. You unlock it with Tier 3 and Basic Steel Production, and it requires multiple inputs to assemble—this can take time. At the same time, you’re laying the groundwork for your later factory, because steel production is the foundation for many future Milestones and phases.
- On one side, produce steel ingots from coal and iron ore. Convert those into steel beams for later.
- On the other side, smelt iron ore into iron ingots and split into two lines: iron plates and iron rods. Turn rods into screws and combine them with plates to make reinforced iron plates. Then craft modular frames from reinforced iron plates and iron rods. Finally, combine the previously produced steel beams with the modular frames to assemble Versatile Framework.
Helpful alternate recipes to simplify this include:
- Modular Frames that use screws instead of iron rods (Alternate: Bolted Frame)
- Improved steel ingot recipes (e.g., Solid Steel Ingot)
- Steel ingots from iron ingots (Alternate: Solid Steel Ingot)
You’ll need Versatile Framework again in later phases, so it’s smart to produce it in bulk. The MAM can help here too: with Power Shards you can unlock overclocking, which significantly boosts your throughput.
Crafting Automated Wiring: Efficient stators and cables

In Tier 4 with Advanced Steel Production, you unlock the final component for this Space Elevator stage. Automated Wiring is quick and simple to make—even with just a single production line. You only need 100, which is far more manageable than the previous materials.
Your base resources here are iron, coal, and copper. From copper ore, make ingots, then wire, then cable. You likely already have this running—cable and wire are core ingredients in many recipes. From iron and coal, produce steel and then craft steel pipes. Combine those steel pipes with wire in an assembler to create stators. Finally, combine stators with cable to produce Automated Wiring.
This part of Phase 2 is straightforward, but you won’t unlock it until late in Tier 4. By then, Smart Plating and Versatile Framework should be in full swing. You also don’t strictly need a full production line here—you can handcraft the 100 Automated Wiring from 2,000 cable and 100 stators if that’s more convenient. You probably already have these materials on hand.
Conclusion: Finish Space Elevator Phase 2 and reach Tiers 5 and 6
The Space Elevator is a crucial linchpin during your Satisfactory adventure. It dictates how far ahead you can build and which Milestones you can tackle next. Finishing Phase 2 lets you focus on Tiers 5 and 6. The production lines for Smart Plating—and especially Versatile Framework—will remain important for later phases. The remaining Automated Wiring can be crafted by hand if needed.
Building complex factories in Satisfactory is even more fun with friends. Rent one of our servers for this builder and work together to complete Space Elevator Phase 2: Rent a Satisfactory server